
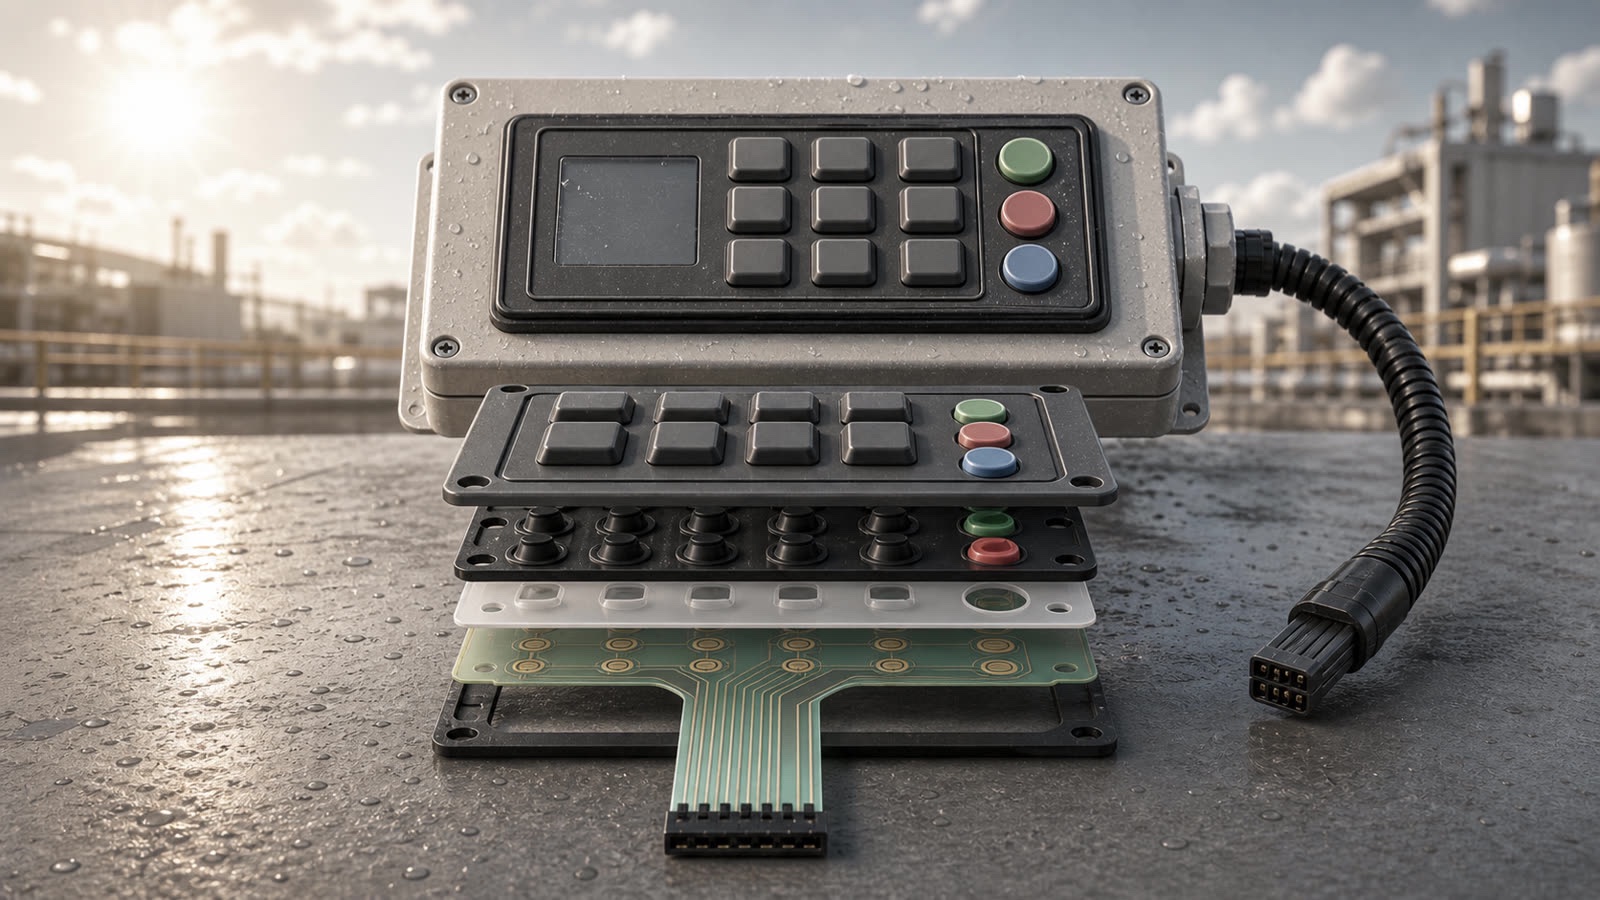
Quick answer: do not approve a silicone rubber keypad for hot outdoor or factory-shift equipment from button layout alone. The important checks are how the rubber returns after repeated presses, whether the legend survives sweat and cleaning, how the carbon contact or conductive pill meets the PCB, and whether the assembled housing keeps dust, moisture, and cleaning residue away from the contact area. If your project needs molded keys or a tactile elastomer interface, the rubber keypads page is the closest product reference.
Why this buyer question is current
Warm-season work conditions are already part of many equipment reviews. The National Weather Service heat safety page is a useful reminder that heat risk is not only a comfort issue. The CDC NIOSH heat stress page also treats heat as a workplace exposure issue. For buyers, that means a keypad used on a handheld controller, outdoor terminal, service tool, or factory station may see hot surfaces, sweaty gloves, cleaning wipes, and longer shift cycles before the first pilot batch is complete.
A rubber keypad can still look fine on a desk sample while the real unit later shows slow key return, glossy worn legends, inconsistent contact, or sticky feel after cleaning. The sample approval should copy the operating condition, not only the drawing.
What heat and shift use can change
Silicone rubber is useful because it can be molded into sealed keys with a soft feel. The risk is that the buyer may only check the first press.
- Key rebound can feel acceptable at room temperature, then become slower after heat soak and repeated press cycles.
- A printed or coated legend can look clean at first, then wear faster when sweat, sunscreen, oil, or detergent residue stays on the keytop.
- Conductive pills can make uneven contact if the housing, PCB, or keypad web is not supported evenly.
- A sealing lip can be compressed too much in one corner and too little in another if the housing ribs or screws are not controlled.
- A tall key can feel good in a loose sample, then bind after the keypad is assembled under a bezel or front cover.
These are not only material questions. They are stack-up questions involving rubber hardness, web thickness, coating, PCB support, screw bosses, and the actual housing.
Keypad structure checks before sample approval
Start with the feel, but do not stop there.
- Confirm the rubber hardness and key height for the target operator. A gloved operator may need a different key shape from a bare-hand medical or office device.
- Ask how the legend is made: molded color, printing, laser marking, coating, or a separate overlay. Match that choice to cleaning and wear exposure.
- Review the conductive pill or carbon-contact layout against the PCB pads. The contact should align after assembly, not only in a flat drawing.
- Check web thickness and return force near larger keys, corner keys, and any long rectangular key.
- Confirm whether the keypad uses a sealing lip, perimeter gasket, molded boot, or separate housing seal.
- Look at venting and trapped air if the keypad sits under a tight front cover. Poor venting can change feel or slow return.
If the project includes backlighting or a display window near the rubber keypad, review it during the same sample stage. Late cutouts or light windows can change sealing and support around the keys.
Tests that are closer to real shift use
A useful sample trial should include the housing and the PCB, not only a loose rubber part.
- Mount the keypad into the real enclosure or a close mockup before judging force and return.
- Run a heat soak, then press the same keys again after cooldown and after a second heat cycle.
- Wipe the key surface with the cleaning agent expected in service, then check legend appearance and sticky feel.
- Press corner keys and large keys more than the center keys, because uneven housing support often shows up there first.
- Inspect the rear side for dust tracks, moisture marks, or contact contamination around the PCB pads.
- Check whether screw torque or bezel compression changes the tactile response.
One common failure mode is a keypad that feels good in the supplier sample tray but becomes inconsistent after the customer assembles it over a slightly uneven PCB. Another is a nice printed legend that wears quickly when operators clean the unit several times per shift.
RFQ details to send for a hot-shift rubber keypad
Send these items before asking the supplier to lock tooling or sampling:
- Keypad drawing, key count, key height, travel target, and preferred tactile feel.
- Housing or bezel drawing, including screw positions, ribs, and compression areas.
- PCB pad drawing, carbon pill size, and connector or tail direction if relevant.
- Expected operating temperature range and whether the unit is used outdoors, near machinery, or in a vehicle.
- Cleaning method: dry wipe, alcohol wipe, detergent, disinfectant, oil exposure, or glove contact.
- Legend method and durability expectation, especially for high-use function keys.
- Any sealing target, dust exposure, splash exposure, or past failure history.
If your team is ready for review, send drawings, photos, application conditions, and quantity through the Request Quote form so the rubber keypad structure, contact plan, and assembled test can be checked together.
Final sample decision
For hot-shift equipment, a silicone rubber keypad should be approved as part of the assembled control interface. Check rebound, legend method, contact alignment, sealing lip, cleaning exposure, and housing compression before treating the sample as final. That review is usually cheaper than finding slow return, worn labels, or intermittent contact after the pilot build has started.
Need help reviewing a structure?
Send your drawing, photos, application, and quantity. Baoshengda can help check the structure before sampling.
Send Drawing for Quote